WE RECOMMEND: Download this tool to find and repair Windows errors
For various PC problems, we recommend to use this tool.
This tool will repair common computer errors, protect you from file loss, malware, hardware failure and optimize your PC for maximum performance. Quickly fix PC issues and prevent others from happening with this software:
- Download this PC Repair Tool with Patended Technologies
- Click “Start Scan” to find Windows issues that could be causing PC problems.
- Click “Repair All” to fix all issues (requires upgrade).
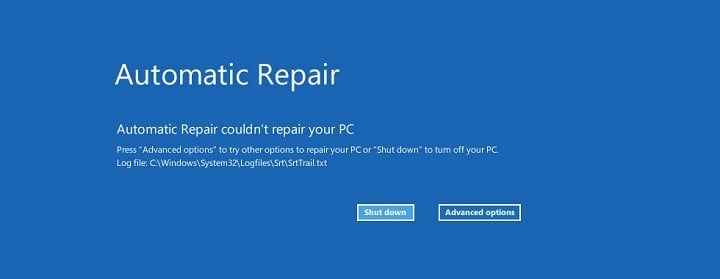
Windows 10 comes with its own repair tool but sometimes Windows 10 Automatic Repair can’t fix your problems — this is that dreaded moment when the “Windows 10 Automatic Repair couldn’t repair your PC” message appears. This is a strange problem but fortunately for you, there’s a way to fix it.
Here are some more error messages and codes you may encounter:
- Windows 10 automatic repair failed
- log file c /windows/system32/logfiles/srt/srttrail.txt Windows 10
- bootrec.exe /fixboot access is denied Windows 10
- Windows 10 automatic repair your pc did not start correctly
- bootrec.exe /fixboot access denied
How To Fix “Windows 10 Automatic Repair Couldn’t Repair Your PC”?
Table of contents:
Fix – Windows 10 Automatic Repair couldn’t repair your PC
Solution 1 – Use Command Prompt from Windows 10 Boot Options menu
After your computer restarts several times, you should see Windows 10 Boot Options menu. When Boot Options menu appears, you need to do the following:
- Choose Troubleshoot > Advanced Options.
- Select Command Prompt from the list of options.
- When Command Prompt appears, enter the following lines and press Enter after each line in order to run it:
- bootrec.exe /rebuildbcd
- bootrec.exe /fixmbr
- bootrec.exe /fixboot
- Some users are also suggesting that you need to run additional chkdskcommands as well. To perform these commands, you need to know drive letters for all your hard drive partitions. In Command Prompt you should enter the following (but remember to use the letters that match your hard drive partitions on your PC):
- chkdsk /r c:
- chkdsk /r d:
This is just our example, so keep in mind that you have to perform chkdsk command for every hard drive partition that you have.
- Restart your computer and check if the issue is resolved.
If you’re still having issues on your PC or you simply want to avoid them for the future, we recommend you to
download this tool to scan and fix various PC problems, such as file loss, malware, and hardware failure.
Solution 2 – Boot to Safe Mode and run Command Prompt
Users have reported that
“Windows 10 Automatic Repair couldn’t repair your PC” message is sometimes caused by a bad driver, such as a
MicrosoftWindows driver for a wireless Logitech
mouse, for example. If you’re having this problem and you use similar hardware, try this solution:
- After your computer restarts few times, you should boot to Boot Options menu. Choose Troubleshoot > Advanced options > Startup Settings.
- Click the Restart button, and your computer should now restart and give you a list of options. Choose Enable Safe Mode with Networking.

- When Safe Mode starts, you need to download an updated version of the driver that’s giving you trouble. You can download the driver from manufacturer’s website, and you can save it to your USB flash drive.
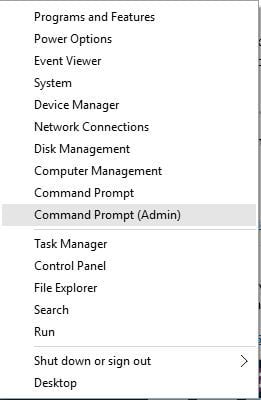
- Press Windows Key + X and choose Command Prompt (Admin) from the list.
- When Command Prompt starts, enter the following and press Enter to run it:
- DISM /Online /Cleanup-Image /RestoreHealth
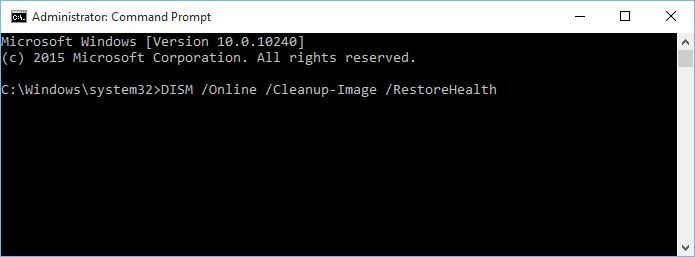
It might take about 15 or more minutes for this process to complete, so be patient. Do not interrupt it.
- After the process is done, restart your computer.
- When Windows 10 starts, install the driver that you’ve downloaded and the issue should be resolved.
This solution is a bit tricky because you need to know which driver is causing you this problem. Even if you don’t know, you can still try this solution and skip Step 3.
Fix – “Windows 10 Automatic Repair couldn’t repair your PC” loop
Solution 1 – Disable early launch anti-malware protection
Sometimes you might get stuck in a “Windows 10 Automatic Repair couldn’t repair your PC” loop and this could be due to Early launch anti-malware protection option. To disable this option, follow these steps:
- After a few restarts, you should be able to access Boot Menu.
- In the Boot Menu, choose to Troubleshoot > Advanced Options >Startup Settings.
- Your computer should now restart and give you a list of options.
- Choose to Disable early launch anti-malware protection (it should be the option no. 8).
- Restart your computer, and check if the issue has been resolved.
It has been reported that this problem can sometimes appear again. If this happens, repeat all the steps and uninstall your
antivirus software. Users have reported some problems with Norton 360 antivirus software (although we assume the problem can be created by other antivirus software as well), so after you’ve deleted this application, everything should go back to normal.
Still, if you are used keeping your computer safe, but the antivirus is the problem, we recommend you to try
Cyberghost VPN (50% off on all plans). This tool will protect your computer from incoming attacks while surfing on the internet, will secure your IP address and will block all the malicious data that will try to sneak into your computer through your network.
Solution 2 – Delete the problematic file
You might get stuck in “Windows 10 Automatic Repair couldn’t repair your PC” loop due to certain files, with users having reported that sometimes VMWare files can cause this issue. To complete this process, you need to open the log file and check for which file is causing this problem. To check the log file, you need to do the following:
- Access the Boot Menu. You should see it after your computer restarts a few times.
- Choose Troubleshoot > Advanced Options > Command Prompt.
- When Command Prompt opens, enter the following:
- C:
- cd WindowsSystem32LogFilesSrt
- SrtTrail.txt
After the file opens, you should see something like this: Boot critical file c:windowssystem32driversvsock.sys is corrupt. We have to mention that this is just an example as you will most likely get a different result. Now, you need to perform some research into what exactly this problematic file does. In our case, vsock.sys was a file related to a third party application called VMWare. Since this isn’t operating system file that is required by Windows 10, we can delete it.
To delete a file, you need to navigate to the specified location using the Command Prompt and enter the del command. In our example, it would look like this:
- cd c:windowssystem32drivers
- del vsock.sys

Once again, this is just an example, and you might have to navigate to a different folder and delete a different file. Before deleting a file, make sure the file you want to delete isn’t a core Windows 10 file or else you can cause damage to your operating system. After you’ve removed the problematic file, restart your computer and uninstall the program that caused you this issue (in our case it was VMware, but it might be a different program for you).
Solution 3 – Disable Automatic Startup Repair
Sometimes you can get stuck in “Windows 10 Automatic Repair couldn’t repair your PC” loop and the simplest solution is just to disable Automatic Startup Repair. To do that, follow these steps:
- When Boot Options start, choose Troubleshooting > Advanced Options > Command Prompt.
- Now Command Prompt should start. Enter the following and press Enter to run it:
- bcdedit /set {default} recoveryenabled No
After you’ve done this, the Startup Repair should be disabled, and you might be able to access Windows 10 again.
Solution 4 – Restore Windows registry
One of the possible causes for “Windows 10 Automatic Repair couldn’t repair your PC” loop is a corrupted registry, and the only solution for this is to restore your registry from RegBack directory. To do that, follow these steps:
- Wait for Boot Options to appear and start Command Prompt.
- In Command Prompt, enter the following and press Enter to run it:
- copy c:windowssystem32configRegBack* c:windowssystem32config
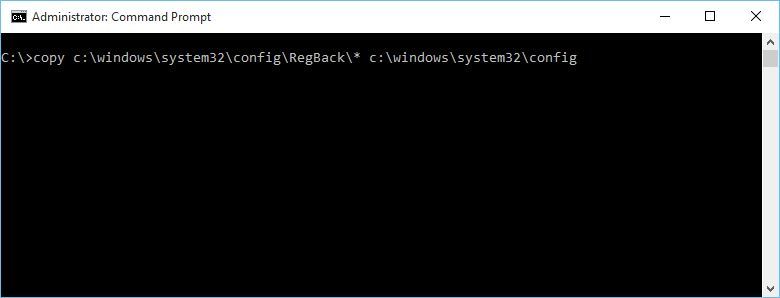
- If you get asked to overwrite files, type All and press Enter.
- Now type exit and press Enter to exit Command Prompt.
- Restart your computer and check if the issue has been resolved.
Solution 5 – Check device partition and osdevice partition
Sometimes it can happen that your device partition values aren’t correct, and this is the cause of “Windows 10 Automatic Repair couldn’t repair your PC” loop. To fix this issue, follow these steps:
- From Boot Options start Command Prompt.
- Enter the following and press Enter:
- Find device partition and osdevice partition values and make sure that they are set to correct partition. On our device, the default and correct value are C: but this can change for some reason to D: (or some other letter) and create problems.
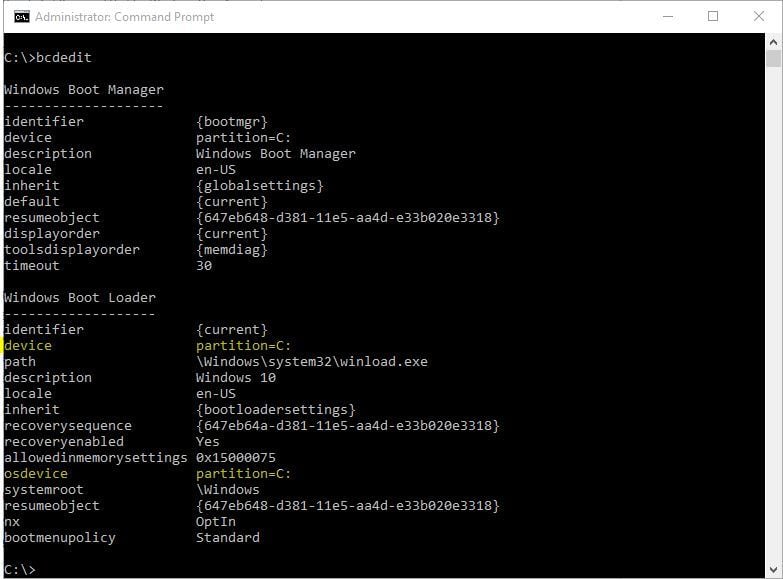
- If the value isn’t set to C: enter the following commands and press Enter after each one:
- bcdedit /set {default} device partition=c:

- bcdedit /set {default} osdevice partition=c:

- By default it should be C: but if your Windows 10 is installed on a different partition, make sure that you use that partition’s letter instead of C.
- Restart your computer and check if the issue has been resolved.
Solution 6 – Perform Refresh or Reset
If the problem still persists, you might have to perform a Reset or Refresh. By doing this, your installed applications will be removed but your installed Universal apps and settings will be saved if you choose the Refresh option. On the other hand, the Reset option will delete all installed files, settings and apps. If you decide to take this step, it’s advised that you backup your important files.
To perform Refresh or Reset, you need to do the following:
- When Boot Menu opens, choose Troubleshooting.
- Choose between Refresh or Reset option.
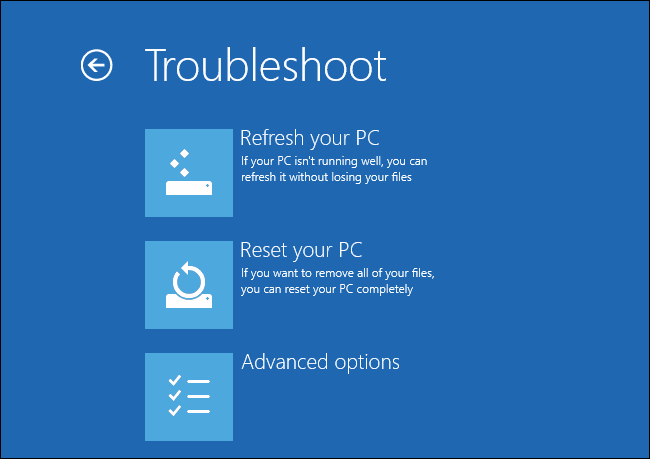
- Follow the instructions to complete the process.
We have to mention that you might need Windows 10 installation media to complete this process, so make sure that you have it.
Fix – Windows 10 Automatic Repair Loop without disc
Solution 1 – Check your boot priority in BIOS
If you want to fix Windows 10 Automatic Repair Loop without a disc, you need to check that boot priority is set properly in BIOS. If that’s the case, you might have to enter BIOS and change these settings. To do that, follow these steps:
- While your computer boots, keep pressing one of the following buttons: F1, F2, F3, Del, Esc. Usually, there is a prompt to press a certain key to enter setup so keep an eye out for it, pressing it while your computer boots in order to enter BIOS.
- Once you’ve entered BIOS, you need to locate the Boot section. The location of this section is different for each type of BIOS, so you’ll have to find it on your own.
- After you’ve found Boot section, make sure that your hard drive is set as the first boot device. If you have multiple hard drives, make sure that the drive where you have Windows 10 installed is set as a first boot device.
- Save changes and exit BIOS.
Users have reported that sometimes Windows Boot Manager might be set as the first boot device and that can cause a “Windows 10 Automatic Repair couldn’t repair your PC” loop on your computer. In order to fix that, make sure that your hard drive is set as the first boot device.
Solution 2 – Remove your laptop battery
Some users have reported that they have fixed Windows 10 Automatic Repair Loop without a disc on their laptop by simply removing the laptop battery. After you’ve removed the battery, put it back on your laptop, connect the power cable and check if the issue has been resolved.
Solution 3 – Reconnect your hard drive
In some cases “Windows 10 Automatic Repair couldn’t repair your PC” error can be caused by your hard drive, and the only solution is to reconnect it. Just turn off your PC, unplug it, open it, and disconnect your hard drive. Now you just need to reconnect your hard drive, connect the power cable, and start it again. Several users have already reported that reconnecting their hard drive has successfully fixed this problem for them, so you might want to try that. We have to mention that this step will break your warranty, so keep that in mind. If you have more than one hard drive, you’ll have to repeat this process each hard drive.
In addition, if you have more than one hard drive, you might want to disconnect only those hard drives on which you don’t have Windows 10 installed. Keep only one hard drive (the one that has Windows 10 on it) connected to your computer, and try to start Windows 10 again. If the issue is resolved, reconnect other hard drives.
Solution 4 – Remove your RAM
Few users have reported that they have managed to fix Windows 10 Automatic Repair Loop simply by removing their RAM memory. To do this, you need to turn off your computer, unplug it and remove all memory modules. Return memory modules to your computer and check if the issue has been resolved. If you have two or more RAM modules, try removing just one RAM module and starting your PC without it. You might have to repeat this step a few times, depending on how many modules you have.
Solution 5 – Remove additional USB drives
It has been reported that you can sometimes fix
“Windows 10 Automatic Repair couldn’t repair your PC” problem by unplugging
USB drives from your computer. If you have any additional USB drives attached, disconnect them, and check if the issue is resolved.
Solution 6 – Change your disk controller mode in BIOS
You can fix Windows 10 Automatic Repair Loop without a disc by entering BIOS and changing few settings. After you’ve entered BIOS, you need to find your disk controller mode and set it to Standard (IDE, SATA or Legacy)instead of RAID or AHCI. Save the changes and restart your computer. If the issue persists, try changing the mode again. If the issue still persists, return the disk controller mode to its original value.
Solution 7 – Enable NX, XD or XN in BIOS
To enable this option, enter BIOS and go to the Security tab. Find XD-bit (No-execute Memory Protect) and set it to Enable. If you don’t have XD option, search for NX or XN and enable it. Save the changes and restart your computer.
Solution 8 – Perform a clean reinstallation
Finally, if none of the previous solutions were helpful, and you can confirm that the hardware is properly working, we can only advise you perform a clean system reinstallation. We’re well aware that this isn’t the desired solution since you’ll lose all the data stored on the system partition. But, once the things take the ultimate wrong turn, the system reinstallation is the final resort.
If you’re not sure how to reinstall Windows 10 and start from a scratch, follow the steps below:
- Download Media Creation tool on an alternative PC. You can do so by following this link.
- Insert the blank DVD or plug in the compatible USB flash drive (4GB).
- Run Media Creation Tool and accept the License Terms.
- Select ”Create installation media (USB flash drive, DVD, or ISO file) for another PC” and click Next.
- Choose the preferred language, architecture, and edition and click Next. Make sure to select the version you have the license key for.
- Select USB flash drive or ISO and click Next.
- Once the setup is downloaded, you can either continue with the procedure with USB or burn ISO file to DVD and move from there.
- Finally, once we prepared everything, restart your PC.
- Press F11 (F12 or F9 or F10 might work, too, depending on your motherboard) to open the Boot menu.
- Choose USB flash drive or DVD-ROM as the primary boot device. Save changes and restart your PC again.
- From here, your Windows setup files should start loading. Follow the instructions and you should be running a brand new system in no time.
The “Windows 10 Automatic Repair couldn’t repair your PC” error is one of the harder errors to fix and it can make your computer almost unusable. Although this is a serious error, we hope you’ve managed to fix it by using one our solutions.
Tell us how your fix ended up below in our comments!
Editor’s Note: This post was originally published in March 2016 and has been since completely revamped and updated for freshness, accuracy, and comprehensiveness.
RELATED STORIES YOU NEED TO CHECK OUT: